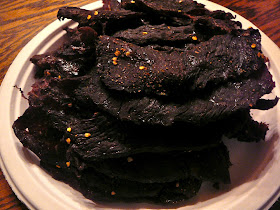
 |
| Make in your oven or in a dehydrator at home. |
I remember Alton Brown rigging a dryer out of a box fan and furnace filters. I don't think I want to do that but with an oven and a home dehydrator there is potential for coming up with a decent jerky I hope.
This morning I have been on a quest for potential recipes. Many are similar to Alton's. I found a top ten list in Men's Journal and between them and Alton I hope to be inspired!
 | |
| 2 1/2 pounds sirloin. |
Ingredients for Alton Brown's JERKY:
2 pounds red meat (beef, elk, bear, venison, wild boar, or any critter you can hunt)
2/3 C. Worcestershire sauce
2/3 C. Soy sauce
2 t. ground black pepper
2 t. onion powder
1 t. liquid smoke
1 t. red pepper flakes
1 T. honey
 |
| Semi-frozen meat slices much easier. |
 |
| Remove and fat or gristle. |
 |
| Mix the brine in the bag. |
 |
| Push out excess air, flatten into a flat container, and refrigerate. |
Remove the meat from the brine and drain well, pat it dry and discard the brine.
 |
| This recipe smells wonderful as it drys! |
If using your oven spray the racks. Next you can place a drip pan on the bottom of the oven to catch any drips then turn the oven's heat to the lowest setting. Place the strips across the racks and prop the door open with a wad of foil. Leave until dry and leather like. I would check every hour or so to start.
Or dry per mfg. instructions in a food dehydrator.
Store in air tight bags at cool temperature.
I am very pleased with the way these turned out. They are very flavorful. I like to send to work with my husband in the event he does not have time for lunch. It is a much better snack than chips or candy!
This was a much less messy endeavor than my past attempts due to the use of the non stick cooking spray and the semi-freezing of the meat before slicing. Both made this a snap. I load the dryer shelves in the dishwasher and am done.

I thank for your time of this wonderful blog read about cleaning!!! I definitely enjoy every little bit of it and subscribed to check out new stuff of your blog a must read blog!
ReplyDeleteSpring cleaning Sydney
End of lease cleaning Western Suburbs