Translate

Showing posts with label Crowd Size Dishes. Show all posts

8/5/15

German Chocolate Cake and Baby Back Ribs for Brian's Birthday Celebration and Sunday Dinner

We fixed 3 full sides of baby backs!

My husband Brian always orders baby back ribs and German Chocolate Cake for his birthday.  This year was no different.  Here are the links to my recipes for you if you want to try them.    thehiddenpantry.blogspot.com/2010/08/brians-smoked-baby-back-ribs.html      and     thehiddenpantry.blogspot.com/2012/02/german-chocolate-cake-plus-cupcakes.html

L to R our youngest son Joel, birthday boy and patriarch Brian, Granddaughter Kate.   
Lights out! Make a wish! And blow out the candles! HAPPY BIRTHDAY!

6/12/15

Watermelon Pops

Summer is here in Indiana and the watermelons are sweet.  This is the second one we have had and both were as sweet and juicy as they can be!  Somewhere, and I can't remember where, I saw the melon cut in a grid and tried it.  The light bulb came on and "Why didn't I think of that?" flashed across my brain!  You get an "icicle" of a slice of watermelon and a nice little square of rind to hold on to!  Handy to pop into your mouth with little muss or fuss.

Just halve the melon.  Place half cut side down and slice across one way at 1 1/2 (or thereabouts) inch intervals.  Than repeat slicing the opposite direction.  AND THERE YOU HAVE IT!  Simple and ready to serve. 

If I am making it ahead of time I store in an extra large plastic bag with the rind ends all pointing out away from the center of the bag.  Easy as can be.

5/22/15

Coney, "Chili Dog" Time! Summer's Here! Grill up some Sausages & Hot Dogs and top them with this AMAZING Coney Sauce!

Smells great too as it's simmering away!
My husband grew up in a little town, Washington, Indiana and has talked about a little mom and pop stand there that sold the most delicious coney's ever.  I have heard about how everyone went there after school (in the 1960's) and there were long lines and so on and on and on......They were known as Kramer's Famous Coney's.  Check them out on Facebook to see what is up!

Well anyway, he ran into a friend who married a gal from Washington and she has given him the reported "secret recipe"!  He is so excited and brimming with anticipation that he actually called last night on the way home from work to ask if he could pick up anything I needed in order for me to serve them up for supper tonight!  Wow.  I sure hope he likes them.  Talk about pressure!  And a big Thank You out there for this recipe!  I am excited to try it!

Easy every day ingredients!
Ingredients for Coney, "Chili Dog" Sauce:

2 pounds ground chuck
1 C. water
1 diced onion
15 oz. tomato sauce
6 oz. tomato sauce
1 C. Old Fashioned Oats
1 T. salt
1T. sugar
1T. chili powder
1/2 t. celery salt
sprinkle black pepper
dash of Worcestershire sauce

Combine chuck, water, and onion in a large skillet and brown.  DO NOT DRAIN.  Stir in  the remaining ingredients and simmer covered for 2 hours.  Serve over grilled or otherwise cooked dogs or sausages on fresh buns of your choice.  Could make some great nachos too!

Week night dinner is served, sliced up a couple of apples for dessert and watched TV!
Easily can be doubled or tripled for crowd!   One pound should be enough to sauce 6 to 10 dogs depending on how much you use per sandwich!  This recipe should make 12-20 chili dogs. I added extra chili powder and a couple of shakes of hot sauce so make it your own.  If it gets thick stir in more water.

Also freezes quite well!

Serving suggestions:  Chips to scoop up any sauce that drips! Cole Slaw and Potato Salad with Lemonade or beverage of your choice.  Make some ice cream ahead and freeze into ice cream sandwiches using your favorite home made cookies! 


1/27/15

Hot Roast Beef Sandwiches in Big Batches to Serve Now or Freeze, Great "Game Day" Fare to Make Ahead

I love these make ahead sandwiches and this roast beef dandy is the second one I am sharing with you.  I prepare them for pitch in dinners, game days, tail gating, freeze them for later, and bake some now and store in the refrigerator for later in the week.  Ree Drummond, The Pioneer Woman, inspired these on her program over this past weekend although I have adapted them for my families tastes.

The first one I featured is made with deli ham and is a family favorite too.  Here is the link if you would like to check them out.  thehiddenpantry.blogspot.com/2010/09/canadian-cheese-soup-game-day.html

Ingredients for Hot Roast Beef Sandwiches:

1/4 C. mayonnaise
1/4 C. coarse deli style mustard
3 T. poppy seeds
1 small red onion grated, about 1/4 C.
2 t. horseradish
good shake of Worcestershire sauce
12 stadium style buns separated and opened (I used large soft buns.)
2 pounds thinly sliced or shaved roast beef
8 ounces Colby Jack cheese sliced
8 ounces fresh mozzarella cheese sliced

Mix together the first 6 ingredients in a small bowl until well blended and adjust ingredients to taste. 


Set up an assembly line of open buns and spread the sauce over all of the tops and bottoms of the buns.


Next slice and break the Colby Jack cheese fitting to the bottom bun stopping inside of the edge. 


 Distribute the roast beef generously atop the the cheese topped bottom buns.


Top with a slice of the fresh Mozzarella cheese.  You do not need a large piece as it is soft and will really melt and spread.

Top with the remaining bun tops and wrap each sandwich in a square of aluminum foil.


Store in plastic bags in the refrigerator and bake later or double wrap and freeze for later.

I did both!  I baked a couple and served them for supper with a side of fresh made Cole slaw and bagged the rest for later.

To bake preheat the oven to 350 degrees F.   Place the foil wrapped sandwiches on a baking sheet and bake for 25 minutes for large sandwiches less if you have made sliders!  Serve and enjoy.  Yield 12 very large hot roast beef sandwiches.


7/23/14

Easy Cheesy Potato Casserole

This makes plenty and even after everyone has a generous serving they are great reheated for another meal. We had 7 for dinner and devoured better than half of a very large and deep 9" x 13" casserole.
This recipe is adapted from a recipe of my sister Linda's and has been a big favorite with our entire extended family.  It is ALWAYS  requested family occasions.  Our daughter-in-law asked for these or twice baked potatoes for her birthday dinner last Sunday.  These are way, way easier to make!  I will confess I had trouble getting it to come out right the first few attempts because I did not initially THAW the potatoes....bummer!  You need to either set the out ahead of time or thaw them under hot water before mixing them up and they will be delicious as well as E-A-S-Y.   This dish easily serves 12.

Ingredients for Easy Cheesy Potatoes:

32 ounces of frozen square cut hash browned potatoes thawed
1 can undiluted cream of chicken soup
2 C. sour cream
1 pound shredded sharp cheddar cheese
salt and black pepper to taste
3/4 C. melted butter divided
2 C. corn flake crumbs or butter cracker (example, Ritz or Club) crumbs

Preheat the oven to 375 degrees F.  Generously butter the baking dish and set aside.

Using a large bowl combine the first 5 ingredients and mix thoroughly.   In another bowl stir together the crumbs and 1/4 cup of the melted butter.  Set this aside.  Stir the remaining 1/2 cup of melted butter into the potato mixture.  Dump the potatoes into the prepared casserole and spread evenly.  Sprinkle with buttered crumbs.  Bake in preheated oven 50-60 minutes until browned and the edges are bubbling.  Serve immediately and be prepared for complements!


1/29/14

The Chocolateberry Cake & Assorted Cupcakes

Dilemmas call for creativity!  I need to make a cake that is half chocolate and half strawberry and I need German Chocolate cupcakes and Strawberry cupcakes made from the remaining batter not used in the layers. 

After doing constructs in numerous ways in my head I have settled on a couple of things.  First I am going to use  boxed cake mixes for this project because it is way too much trouble otherwise plus my German chocolate cake recipe is ENORMOUS and makes 3 big layers!  Box cakes are much more predictable and precise size wise!

Ingredients:

1 German Chocolate Cake mix
1 Strawberry Cake mix   
1 can of Chocolate Butter Cream Frosting
1 can of Vanilla Butter Cream Frosting
1 can of Strawberry Frosting
1 can of Coconut Pecan Frosting

First follow package directions baking one 9" layer of each flavor and a dozen cupcakes.  After removing the layers from the cans and cooling completely.  Slice each layer in half and frost to make a half chocolate and a half strawberry cake.  Next join them with additional frosting (one chocolate frosted and one strawberry frosted)  into one two layer cake!  One side pink and the other side brown!  I used the Vanilla Butter Cream to affix the 2 halves at the center.

NOTE;  To assure success I picked a plate with a slight concave center and dabbed about 2 tablespoons of the appropriately flavored frosting to adhere each bottom layer.  Placing the ROUNDED side of the cake down. After frosting the top of the bottom layer I placed the FLAT side of the second later atop and finished frosting. 


Here is the partially frosted cake, half chocolate, and half strawberry with the vanilla frosting cementing it at the center.
Next I used the Vanilla frosting on the sliced half of the layers and repeated the process above with the other half layers butting the second half of a cake against the Vanilla to affix into a round layer cake.

Frost half the German Chocolate cupcakes with Coconut Pecan frosting and half with plain chocolate.  Then finish the Strawberry cupcakes with the Strawberry frosting.  There you have it!  Something for everyone!  The Chocolateberry cake.

I am making this almost a week before I will be serving and so I like to place the frosted cake in the freezer and after it has completely frozen wrap it well with plastic wrap.   This will keep it perfectly until I thaw it the day it is needed.  Yield 1, 9" layer cake and 24 cupcakes.

1/27/14

Turkey for Sunday Dinner

We didn't fix a turkey over the holidays and a few weeks ago I bought a 20 pound fresh turkey for 59 cents a pound! Then I stuffed it in the freezer for another day.  The last half of the week I have been thinking of a Sunday dinner composed of things I am not tired of and had not had for a while. 

First I decided on Corny corn bread and then on Asian slaw.  Next cane the whole 20 pound turkey with mashed potatoes and gravy.  Sounds good to me.  Friday I mixed up a batch of my own Brownie mix and baked a double batch so dessert is done.    thehiddenpantry.blogspot.com/2012/10/sweet-italian-sausage-potatoes-kale.html  is the link for the Corney Corn Bread recipe.     thehiddenpantry.blogspot.com/2010/09/grilled-chicken-chinese-slaw-orzo-with.html   is the link for the Asian Slaw recipe.     thehiddenpantry.blogspot.com/2012/10/homemade-brownie-mix-and-walnut-brownies.html   are the recipes for both the mix and the Brownies.

Ingredients for Roast Turkey with Mashed Potatoes and Gravy:

1 whole turkey fresh or completely thawed, 20 pounds
Salt
Pepper
olive oil or butter

The first thing to think about when preparing a frozen turkey is the thawing.  Either place it in the refrigerator for 3-4 days or fill a large sink with cold water and submerge the wrapped turkey for about 12-16 hours.  Take the turkey from the package and remove the neck and giblets.  Dry the turkey and butter or oil him well then season generously both inside and out.

I place the neck in the bottom of the roasting pan to serve as a rack and portion the bird atop.  Then I tent the bird with foil or place the lid on the roaster.  I am not as much interested in a browned bird as I am a moist bird.  PLUS NOBODY I HAVE EVER KNOWN WALKS THE FINISHED BIRD ON A PLATTER TO THE TABLE TO CARVE IT?

What's that all about?  The meal would be cold at our house by the time you carved that much turkey to feed that many people!

So, I roast him ahead, let his sit and cool, carve him and place the slices attractively in a large covered glass low sided casserole to warm up at dinner and serve.  Way, way, way less hassle in my life!

Turkey Gravy:

Not much is better than rich delicious turkey gravy.  Take about a cup of the drippings and stir in about 2 tablespoons of flour over medium heat stirring to get the raw flour taste cooked out and add 1 C. of tap water and stir like heck while it comes to a boil and thickens.  Taste for salt and pepper.

Mashed potatoes:

1 potato per person plus add 1 for the pot is my rule of thumb
1 T. soft butter per potato
2-3 T. milk per potato
Salt
Black pepper


Peel and quarter the potatoes into a kettle with water to cover by 1".  Add a heaping tablespoon  of salt to the water and potatoes before cooking.  Cover the pan with it's lid and bring to a boil.  Next  reduce the heat and cook until fork tender.    Drain well.  Add the potatoes back to the pan with the butter and milk and beat with an electric mixer or mash with a hand masher until you reach the desired consistency.  Add additional milk, butter, and seasoning to taste.  (People have different ideas about how they like their mashed potatoes, probably based on what they grew up on.  So I leave quite a bit of latitude in these instructions.) 

I served 6 adults dinner tonight and would have had enough for 8-10. 


11/27/13

Carving the Ham and the Turkey TODAY, Peeling Vegetables, Baking Pies for Tomorrow.

Ham as it came from the oven.

Turkey breast as it came from the oven.
I have never seen a turkey or ham carved at the table in real life.  (Does this just happen on TV?)  Our family always does everything in the kitchen and luscious platters and bowls of food are taken to our family table or set up as a buffet,  a prayer of Thanksgiving is said over the meal and the family enjoys the feast.  As I have gotten older and the family has gotten bigger I have found it easier to do as much as possible ahead of time.

So.....yesterday I roasted the turkey and baked the ham, both at the same time I might add!  I wrapped them in large plastic bags after cooling and today I carve them and place them into large covered casseroles to heat back up tomorrow.  The stock was strained and saved for the gravy. 

I have thawed the pie dough that I made ahead and froze to roll out and bake the pies this evening.  Today I will clean and chop all of the vegetables for tomorrow.  This includes dicing the celery and onions for the stuffing or dressing, whichever you call it. The potatoes will be peeled and left covered with water, ready to go!  Preparing the vegetables and dip.  Making the fruit salad and cranberry sauce.  After that I set the table and bring up extra ice to have ready in the kitchen freezer.

Kate and perhaps Emily are coming this afternoon to make cookies for Thanksgiving!  Now let me wish you all a Happy Thanksgiving too!

10/7/13

Stuffed Bell Peppers and I'm Lovin' Harry's Eggs!

My Mother made this at home every summer and we all love this dish!
Brian came home Thursday night telling me one of his customers is selling eggs and has plenty of them to spare.  I get really happy when I hear of another local source of foodstuffs I use.  My previous source doesn't have them and this was a welcome development!

Harry Brown is less than 2 miles away and just the next road southeast from here.  The funniest thing is that my new orthopedic doctor was telling me all about a farmer who lived behind him who had eggs and a tremendous garden.  Come to find out it is Harry and my doctors house is just beyond his garden! 

So.....I bought 10 dozen fresh eggs and they are neatly stacked in my down stairs refrigerator.  Harry asked if I would like to see his garden and promptly had me board his golf cart and away we went up the hill!

Garden does not do it!1 He has several of the most beautiful gardens I have ever seen!  All situated beyond 40 happy hens laying beautiful brown eggs and two small lakes, bordered by a grove of pecan trees and a blueberry and blackberry patch.

Wow was all I could say and he proceeded to load me up with fresh (he kept jumping off and picking veggies to give me) zucchini, yellow squash, cucumbers, egg plants, and a half dozen of the biggest bell peppers I have ever seen.  When I tried to pay him for the  treasure trove of vegetables he refused to take a cent saying, "I take care of my egg customers!"

Thus Sunday dinner was set out before me, I would make stuffed bell peppers!

Ingredients for Stuffed Bell Peppers:

6 large bell peppers
2 pounds ground chuck
1 pound shell macaroni
2 T. olive oil
1 large red onion
4 cloves fresh garlic
1 t. kosher salt
1/2 t. ground black pepper
1 t. sugar
1 quart (4 C.) tomato juice  (I used my home canned juice.)
2 cans condensed tomato soup undiluted
1 pound cheese (I used Velveeta)

Preheat the oven to 325 if you plan to bake now.  Butter 2 large casserole dishes and set aside.  Bring a large kettle of salted water to a full boil.

Meanwhile core the peppers and slice them in half if they are large and remove the veins and seeds.  Prepare a large bowl with ice adding water to cover about 2".  Set the ice bath aside and plunge all of the peppers into the boiling water.  Leave them in the water and time 5 minutes from the time you put them in.  Remove after 5 minutes and plunge into the ice bath to shock them.  Drain and set aside.  I use a spider or tongs to remove the peppers and retain the water to cook the macaroni in.  Cook the pasta according to the package directions.  Drain and rinse in cold water to stop the cooking.  Set aside.

Dice the onion and garlic.  Add the oil to the bottom of a large pan and saute the onion and garlic a minute.  Add the ground chuck and cook until the meat is browned.  Add the salt and pepper, tomato soup,  tomato juice, and sugar.  Stir in the macaroni and taste and correct the seasoning. 

Spoon the meat mixture into the pepper halves evenly and top with cheese.  Bake in preheated oven 40-45 minutes or until bubbling around the edges and the cheese has melted.  Yield 10-12 servings.

We had the three of the "University of Southern Indiana" girls for dinner who loved this dish and had seconds!  Which pleased me greatly!

9/18/13

EASY Slice and Bake Chocolate-Wafer Cookies, Grandaughter Tested and Approved with a BIG Thumbs Up and a Smile.

Maybe a year ago I purchased a terrific cook book that we have enjoyed and to date have not been disappointed with!  It is called "Make -A-Mix" by Karine Eliason, Nevada Harwood, & Madeline Westover and it exactly as the title implies a book of mixes to make at home.  We have especially enjoyed the brownie mix and the frozen cheese sauce.

This is a cookie recipe I have long had my eye on to adapt for our family.  First because it calls for cocoa and I prefer the flavor of recipes calling for cocoa, secondly because it seems to be along the lines of a butter cookie that would be easy to handle in shaping.

Easy to work dough.
As I mixed it up I found this to be true!  Not a dry crumby dough and not a slack overly loose and sticky dough,,,,but just right and easily formed into rolls to freeze and slice.

Forms beautifully into logs.
I also LOVE freezing rolls of cookie dough to slice.  So easy and convenient!  I am on my second roll of Reynold's Wraps Non-Stick Foil and it was just great to just spoon the dough out onto in 4 equal portions.  (Although the cookbook recommends plastic wrap or waxed paper.)

Ready to freeze and store.
Then I formed the 4 handy rolls and popped them into the freezer.  I think these will make perfect ice cream sandwiches,  crumbs to form pie crusts,  and just plain good cookies for dessert and treats.


Ingredients for Slice and Bake Chocolate-Wafer Cookies:
2 C. butter at room temperature
2  1/2 C. sugar
3 large eggs
2 t. vanilla
5 C. flour
1 t. baking soda
1/2 t. salt
1  1/4 C. unsweetened cocoa powder

Cut 4,  14" x 12"  pieces of plastic wrap, waxed paper, or foil and set aside.  Using a large mixing bowl and mixer combine the butter, sugar, eggs, and vanilla creaming until very light and fluffy.  A stand mixer is handy for this if you have one available.    In another bowl sift or put through a sieve the flour, salt, soda, and unsweetened cocoa.  Slowly add the dry ingredients and stir to combine well.

Spoon the dough equally onto the 4 pieces of wrap and form into logs of dough 8-10" long.  Wrap each roll securely and package for freezing as needed.  ( If using plastic or waxed paper wrap again or place in a plastic freezer container or sealed plastic bag.)  Label and date contents.  Store in the freezer and use within 6 months.   The 4 rolls of dough yields about 12 dozen cookies.


To make Chocolate-Wafer Cookies:

Preheat the oven to 350 degrees F  (175C).  Use parchment paper lined baking sheets, silpat mats, or lightly grease pans.  Slice the frozen dough into 1/4" rounds.  Arrange on prepared baking sheets about 1/2 " apart.  Bake 8-10 minutes until cookies are set on edges and slightly firm top.  Remove cookies and cool on racks.  Makes about 36 cookies.

I like that there are 3 remaining rolls of cookie dough made up and ready in my freezer.
I like that one roll is enough for just the 2 of us or bake more for company.
I like that they are versatile and yummy too.


9/3/13

BBQ Pork Sandwiches and Chicken Soup with Noodles and Rice make for a Great At Home Buffet.

We finished the pork off in the crock pot simmering in sauce.
We threw together an impromptu buffet line on Labor Day serving a Soup and Sandwich menu for whoever dropped in for a visit.  I didn't really call anyone.  All of our family knows they are welcome and to just come if they would like to.  I have always had plenty on hand.

Brian started off Sunday afternoon smoking a dry rub seasoned boned pork but using dark beer, onions, oranges, and peaches in the water bath of his gas smoker.  He loaded it with water soaked apple wood chips and set the temperature at 275 degrees F. for 3 hours.

We had a big storm blow up and it was getting late in the day and neither one of us wanted to stay up all night watching the pork so we pulled it off with an internal temperature of 150 degrees F.  Next we wrapped it in foil and stashed it away in the refrigerator and headed off to bed.

Monday around noon I cut the undercooked but smoked pork into 3 pieces to fit into the crock pot with it's accumulated juices and a can of root beer and set it on low and moved on to a  pumpkin pie I planned to go along side the cookies from the previous evenings  baking.  When it is fork tender remove the meat and shred it removing any fat and membrane.  Discard the cooking juices.  Return the meat to the slow cooker and add your favorite sauce.  We like a combination of apple juice mixed with Bulls-eye BBQ Sauce and hot sauce.

NOTE:  I have made great pork BBQ entirely in the crock pot by cooking the whole time in the crock pot and using the root beer.  Just start much earlier in the day.  6-8 hours on low heat.  Drain the cooking liquid off and discard. Shred meat removing any fat or membrane and add your favorite sauce.

Chicken Soup is always a winner,
Ingredients for Chicken Soup with Noodles and Rice:

4-6 quarts chicken stock
2-3 large chicken breasts
1 large onion diced
4 diced carrots
4 ribs of celery diced
2-3 C. cooked rice
1 package old style noodles
salt
pepper
chicken bullion cubes
olive oil

This is a soup that can vary depending on how much you want to make.  I made a lot and used 6 quarts of stock.

Preheat the oven to 400 degrees and season the chicken.  Slather a half sheet or other suitable pan with olive oil and place the chicken onto the prepare pan.  drizzle a bit of oil over the chicken and roast it 45 minutes of until the juices run clear when pressed.

Meanwhile simmer the carrots, onions, and celery in the stock until tender.  Taste the stock and fortify with bullion cubes if needed to enhance to a full flavored soup base.  Turn the heat back to it's lowest setting for now and just let it steep.

Cool the chicken enough to either shred or dice, whichever you prefer.  I sort of do a little of both!

About 40 minutes before serving time bring the stock to a boil and add the chicken.  Return to a boil and add the noodles.   Ten minutes before serving time add the cooked rice.  I like to use cold cooked brown rice for a nice shot of nutrition and texture.  Use whatever your family likes or what you have on hand.

We set out the bowls, buns, condiments, filled the ice bucket and announced dinner was served!


7/7/13

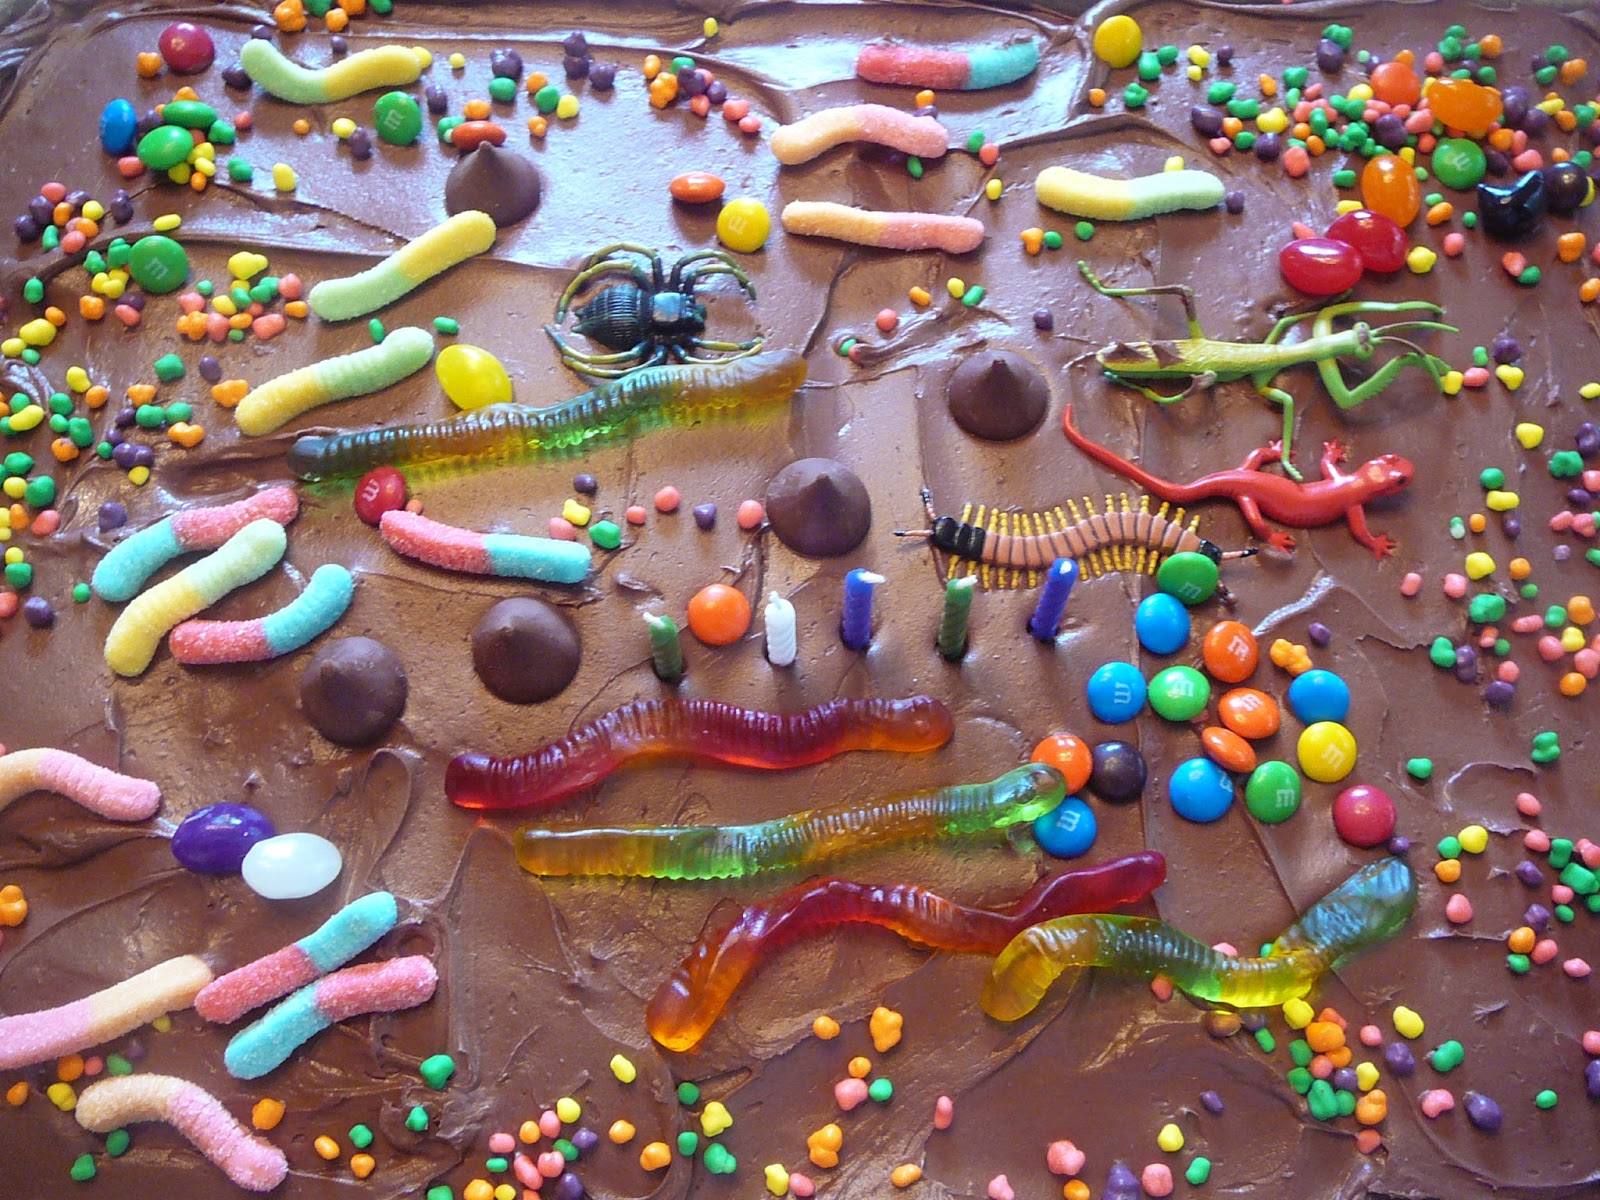
EXTRA EXTRA! 5 Year Old Twin Boys Decorate Their Own Birthday Cakes and Have A Blast! Read All About It!!

Sam's creation had a lot of c-r-e-a-t-u-r-e-s as he called them. 
Jack's Creation had a lot of everything.
Yup, they are big stuff now!  5 years old.  Our twin grandsons decorated their own cakes this year and they had a blast!!  Grandma had quite a good time too I might add.

Ingredients for Birthday Cake Decorating for Twin Boys:

2 boxes cake mix made as package directs and baked in a half sheet or jelly roll pan, reduce baking time about 8 minutes or so.  Test for doneness by baking until inserting a tooth pick in a center it comes out clean.  Bake and cool ahead of time.
4 cans corresponding cake frosting
gummy worms
fruity gummy worms
chocolate kisses
M & M's candies
nerds candies or assorted sprinkles
assorted small rubber or plastic "creatures"
birthday candles
paper towels

Strawberry Cake frosting, candles, nerds in a dish, candy in a tray.
Chocolate Cake, frosting, candles, nerds in a dish, candy in a tray.
Arrange a lot of paper towels across the end of whatever table or counter the children will be decorating at.  This will save tons of clean up mess later! 

Both Boys Had a Tray of Assorted Candies.
Arrange the candies in a dish and the creatures in another next to the cake to be decorated.  Place them so they are easily reached by the children.  An adult can now spread the frosting onto the two sheet cakes.

Assorted creatures as Sam says!
While the frosting is fresh have the children decorate their cakes.  Everything will stay in place very well now.  You do have to be careful about sleeves though!  We were intrigued by how different yet wonderful both boys did their own cakes!  When they have completed the decorating let them pick their candles and arrange them too atop the cakes.  Now slip the paper towels and mess out from beneath the cakes and the mess is over.

NOTE:  The boys wanted to be sure and take their "creatures" home so their cousin Emily washed and dried them as soon as the the candles were blown out and while I was cutting the cakes.  

We did not light the candles and sing until later in the day but the boys kept checking out the great cakes they had done!!  It was indeed fun for all!!

Yield 24 generous portions.  Served with fruit from the shark centerpiece!!  Link for Shark centerpiece    thehiddenpantry.blogspot.com/2013/07/shark-centerpiece-filled-with-fruit.html