Translate

Showing posts with label Gifts to Make. Show all posts

12/9/15

FESTIVE PARTY Scarves End this Sewing Project

Single Loop Glittering Metallic Purple Scarf.
Today I finished 6 festive party or special occasion scarves and two red paisley scarves.  This is the end of this current scarf session!  There are some I will wrap in tissue, box, and wrap as gifts, some I will keep for myself, and some I will place neatly in my "gift" drawer for later gift giving.
Double Looped Ice Blue Metallic Scarf.
What I love about them is the ease with which they change the whole look of an outfit.  Add a glittering metallic to a dark turtleneck and trousers and it becomes quite sheik.  Sort of Lauren Becall or Katherine Hepborn!
Single Loop black Velvet with Glitter Pattern.
Double Loop Black and Gold Metallic. (Side A)
Or wear with a skirt and sweater with a glittering scarf and again I see a very quiet elegance bursting through but with a loud whisper!
Single Loop Royal Blue Metallic Scarf.
One of the fabrics really stumped me.  I could not decide which side I preferred so I made two scarves, one of each side.  I will never know which side was meant to be the "right" side.
Black and Gold Double Looped Scarf. (Side B)
Really I have thought this to be great fun and I hate to say I am done!  I may have to make a few more?  We will see....If you would like directions to make one please click on the following link I am happy to share.      thehiddenpantry.blogspot.com/2013/01/infinity-scarf-circle-large-double-loop.html
Silky and Lightweight Double Looped Red Paisley Scarf.
Tomorrow I round up lace and batting for a new project.  I will see you again with it I feel certain.

12/4/15

Holiday Sewing! Quick Scarves & Cozy Tied Throws for Starters

Soft and cozy royal blue ribbed knit is outstanding!  So I made two!
A few weeks ago I took a quick inventory of winter knits that might be lovely as scarves.  I wanted some bulky, some silky knit, and all pretty.  My first dive into the first tote netted enough for six cowl or circle or infinity scarves.  I was looking for in the neighborhood of 2 yards by 11 or 22 inches.  Not all the same but in the neighborhood!

Love this soft and silky but with medium heft.
Red, black, and white cable is quite striking as well as so soft!


I REALLY like this very soft and a little bulky number and I made two of this too.


Six scarves lined up and done. 


Next I went through the three quilting totes and found three pieces suitable for tied comforter style throws.  I am not sure if I will give them all as gifts or who I might gift them with but I am enjoying getting back to my treasures!

Two velvet and one cotton patchwork topper for a throw.
I plan another fabric dive as soon as I get finished with these pieces!  I also hear throw pillows calling my name. Listen.......do you hear it too?  Ops I had to do it!  Thinking Christmas or New Years Eve sparkling glittering scarves!  Lots to do!

GLITZ GALORE! May go for something festive!
If you want to make one of these scarves (or more).  For each scarf cut fabric 2 yards (72")  by 22 inches.  Fold with right sides facing longways.  Machine stitch 1/2" from the edge the long seam.  Turn right side out.

Fold scarf in half.  Match the raw ends.  Pin right sides facing of the ends and machine stitch leaving a 4" to 6" opening.  Turn the scarf right sides and fold the raw edges of the opening together to close then hand stitch the opening closed.  You are all done!

NOTE:  For complete instructions with photos go to my link as follows..... thehiddenpantry.blogspot.com/2013/01/infinity-scarf-circle-large-double-loop.html
Of course you can plat around with the dimensions too!

3/14/15

Birthday Cookies

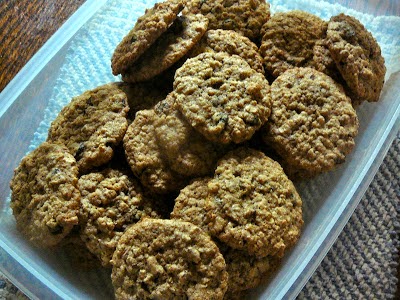
After cooling I made up a big sack of both snicker doodles and oatmeal cookies and placed them in a birthday gift bag adding tissue paper and a birthday card to finish the home made gift!
Our friends the Linton's often celebrate birthdays with us as my birthday and Mike Linton's are but a couple of days apart and we are the same age but yes, I get to be the older one.  Let it be known that Mike Linton is a COOKIE MONSTER from way back!  He is a very seasoned and capable heating and air expert and once upon fixing our furnace would only take my home made Snicker Doodles in payment!    thehiddenpantry.blogspot.com/2010/08/old-fashioned-snickerdoodles.html

A hot cup of coffee and a few snicker doodles hit the spot every time.
Mike and Mindy have often tasted other cookies that were here when they visited and if I remember correctly they also love Oatmeal Cookies.  So today was double batch baking day.  We are splitting a batch of each with them for a birthday gift.    thehiddenpantry.blogspot.com/2012/08/oatmeal-cookies-cinnamon-clove-pecans.html

Since I was making a batch of each I did a couple of time and trouble savers I'll call them helpful hints!   Also altered the oatmeal cookies by reducing the chopped pecans to 1/2 cup and adding 1 cup of cinnamon chips.  YUM!

My helpful hints are : 
When making two different cookie doughs in one day make the plainest one first then you can reuse the bowl, beaters, and utensils again for the second batch without washing.  Thus I made the snicker doodles first.

When using a scoop to dip up cookie batter as I did with the snicker doodles dip the scoop into a half cup of sugar between scoops.  The batter will not stick to the scoop. 

Use  the left over "scooping" sugar in the second batch of cookies as part of the sugar needed in the batter.  *I also used the leftover cinnamon and sugar mixture from rolling the dough balls in as part of the required sugar in the oatmeal cookies.  A little extra cinnamon never hurt an oatmeal cookie!

So, love in a cookie is always a welcome gift says Grandma Diane!  


2/15/15

Sewing a Gentleman's Eye Compress and Eliminating My Pile of Mending

Gentleman's Eye Compress
I have been given a project by our middle son Mike.  He has asked me to make an eye compress for a friend.  The description was much too colorful to elaborate on here but suffice to say he needed two pouches to hold rice connected in the center.  You see his friend's eye doctor described this to be microwaved a few minutes and used warm across both eyes as a remedy for tired dry eyes.  I am happy to give this a whirl!

The top one is more practical as the larger amount of rice will hold the warmth longer.
First I selected a soft cotton flannel fabric and laundered and dried it.  Next I traced two sizes using tailor's chalk, a wide mouth jar lid, and a small saucer as patterns.  I was uncertain what size I would end up with after sewing and filling the pouches with rice.  As it turned out the larger is more practical as the larger amount of rice holds the warmth longer.

I will leave the opening to turn the compress right side out LARGER the next time.
Next I double stitched around the edge with the right sides facing each other 1/4" from the raw edge.  I left an opening not stitched at the bridge large enough to turn the compress right side out.  The next time I will leave the opening larger for ease of turning. 

A quick trip to the kitchen for a funnel and a bag of rice and I was near to completion.  After filling the two sides with a comfortable amount of rice I hand stitched a double row across the opening to close and for added strength.  The bridge width can be adjusted by lightly twisting to shorten the length of the connecting strip as needed. 

Just microwave a couple of minutes to warm and you are all set to relax! 

My stack of mending projects was 5 deep!
Mother always had a stack of mending to do.  Much more than I do as many items nowadays don't hold up long enough to mend.  I wonder does anyone else out there mend?  It Is not a phrase I have heard anyone use in years.

Possibles Bag
After making the compress I thought I would clean up my stack so I repaired a friend of my husband's "possibles" bag.  (A utility type bag men use/carry when shooting cap and ball type firearms as a hobby.)  The strap was loose so I stitched it back!

Next I cut off a pair of our grandson's PJ's with the knee out and hemmed them.  Good as new!  Now I am in the backstretch...with only my husband's long underwear to mend and a button to match and sew onto a pair of slacks.  And now he mending is done until the next time.


2/12/15

Chocolate Chocolate Heart Cookies for Valentines

Chocolate Heart Cookie Dipped in Melted Semi-Sweet Chocolate and Sprinkled with Pink Peppermint Chips.
I always bake cookies for holidays and judging from the number of heart cookie cutters I have collected over the years Valentine's Day has never been taken lightly!  The chocolate batter comes from an episode of Ree Drummond's Pioneer Woman.  I love sprinkling in new recipes with my old tried and trues.  Last Sunday I mixed the cookie dough up as I made the pastry for a blueberry pie with intentions of getting them together way before now.  It has chilled in my refrigerator in a zipper bag for days now but rolled out just fine after letting it warm a bit.

Ingredients for Chocolate Message Cookies or as I call them Chocolate Chocolate Hearts:

2 1/4 C. flour
1/4 C. unsweetened cocoa powder + more for dusting and rolling
1 t. baking powder
1/2 t. ground cinnamon
1/4 t. salt
1 C. (2 sticks) room temperature butter
1 C. brown sugar packed firmly
1 1/2 t. vanilla
1 lg. egg
chocolate chips (any color or flavor desired)  to melt for drizzling and heavy cream to dilute if needed (just a droplet or so), optional
powdered sugar and stencils, optional
buttercream frosting for frosting or pipping, optional
 
Combine the flour, cocoa, baking powder, cinnamon, and salt in a bowl and whisk.  Set aside.

Cream the butter and sugar in the bowl of the electric mixer.  Add vanilla and egg beating well.  Add the flour mixture a third at a time blending after each addition.

Place the dough in a plastic bag or wrap well forming into a disk.  Refrigerate at least 2 hours.

When you are ready to bake off the cookies pre-heat the oven to 350 degrees F.  Prepare the baking sheets with parchment paper or sil-pat baking mats and set aside.  Dust your work surface and rolling pin with unsweetened cocoa powder.

Remove the dough from the refrigerator and allow it to sit on the cocoa powder for 10-15 minutes or so until it softens enough to roll 1/4" think.  Dust the heat shaped cutters with cocoa powder before cutting into shapes.  Place on baking sheets.  Consolidate the dough left and re roll until all of the dough is used.

Bake cookies for 11-12 minutes until set but not browned.  Allow to cook in pans before removing then cool completely before decorations begin!

To decorate with stencils place them on cookie and cover the rest of the cookie with bits of wax paper and sift powdered sugar onto the decoration.  Carefully remove stencil and wax paper and dust any stray bits of sugar off with a small brush.

To drizzle melt chocolate chips a few seconds at a time in the microwave stirring until smooth.  If needed thin slightly with a drop or two of cream.  Drizzle as desired!  Mine are dunked!  While the chocolate was warm I sprinkled pink peppermint chips on some of the cookies.

To frost with buttercream for each cup of powdered sugar use 1 T. room temperature butter and 1/2 t. vanilla.  Add heavy cream stirring until you reach the desired consistency.  Tint as desired using food colors.

Do NOT stack these cookies!  Instead display on a large platter or under domes.  Present to your Valentine with a smile!


1/21/15

Oatmeal, Flax, and Walnut Cookies and Trail Mix, Change Up Old Recipes and New

Trail Mix.
Oatmeal, Flax, Walnut,  & Raisins make these Oatmeal Cookies!
Munchies that pack a little extra punch are always a good thing!  This crunchy, salty, sweet, tart, chewy, and chocolate trail mix really hits all the notes!  Ground flax seeds push the nutritional score for oatmeal cookies with walnuts, raisins, cinnamon, cloves, and the less processed old fashioned oats even higher and also ups the fiber ante.    thehiddenpantry.blogspot.com/2012/08/oatmeal-cookies-cinnamon-clove-pecans.html   is the link to my basic recipe which I adapted by using walnuts and adding 2 tablespoons of freshly ground flax seeds.

Yesterday afternoon I got busy and made up the cookies for my husband to take to share with all of the gunsmiths at Paducah Shooters Supply where he is visiting today!  Not only is this his favorite cookie but he loves to share them with his friends.  I had already packed up the majority of them when I thought to take the picture.  My bad.

I admit to having slacked off my ongoing diet after Christmas while I have been fighting this crazy cold and enduring the winter doldrums.  But even then, I drink no calories.  I up the non starchy vegetables and try to stay away from the "white stuff".  My biggest obstacle is no good tomatoes!  Thus my staple and favorite meals of eggs and tomatoes and everything else with tomatoes runs amok!

Ingredients for Trail Mix:

1 C. cashews
1/2 C. walnuts
1 C. mixed nuts
1  1/2 C. combined of your favorite dried fruits like bananas, blue berries, apricots, cranberries, cherries, raisins etc.
1 C. chocolate chips or mixture of M & M's, dark chocolate chunks etc.

Stir altogether and enjoy! I like to have things like this around when I feel weak willed and need just a little something special.   A tablespoon or two of this and I am good to go.   Way better than a binge on something unexpected!

1/9/15

The Family Calendar, a Lovely Gift and a Good Habit

This year my 86 year old Mother gave me a calendar she had marked with all of the anniversaries, birthdays, and deaths of all of the members on our side of the family.  It is more detailed than the one I have kept.  I really appreciated this and happily added all of the information from my husband's side and of our friends.  Now it is more complete than ever and I greatly appreciate it and will cherish it.

I also keep track of appointments and shots on this calendar and transpose it onto another each year.  I am later than usual this year as is with everything else!

Actually I keep 2 copies, one in the kitchen and the second down stairs on the wall above the desk where I use the computer, pay the bills, do the taxes, and otherwise maintain an office and files.

Each time I think of this I realize what a simple thing but yet how thoughtful and valuable it is.  Mom made 5 copies this year.  One for herself and for each of her children.  This is just an example of a lovely thoughtful gift that does not have to cost a lot of money but can be priceless to someone you love.  Just thought I would share and pass it along.......

Thanks Mom!

12/11/14

Christmas Gift, Tablecloth Finished

With Love in Every Thread
This has been a labor of love and I am happy with the end result I think....never really sure it could not have been a little better.  But that is just me!  It is really pretty though and I would love it on my table so that is as good as it can be I think?

After stitching I did the final pressing.
To make the finished edge I ran a line of straight stitching  3/8" all the way around from the trimmed cut raw edge.  Next I used a hot steam iron and folded the edge under to the wrong side just above the stitching so it does not show on the right side of the finished tablecloth.  Then fold again and press.  Using dressmaker pins I pinned every 12" or thereabouts except the corners which I pinned more closely to ease them.  The final step was to stitch 1/4" from the folded edge of the tablecloth and do the final pressing.  NOTE:  It is really important to watch the tension of the sewing machine as you do this as you will not have attractive stitching.

Nothing left but to wrap it up and deliver!  Then on to my next project!


12/7/14

Cutting the corners of THE CHRISTMAS TABLECLOTH.

Well after my pondering was through this morning I did it.  Snip, snip, snip!  I found on an edge it is a Hallmark Fabric.  Whatever that may mean!

First I folded right side in down the length of the fabric and pinned the edges straightening to the very best of my ability!  Then I folded in half cross ways lining up all four corners.  Nest I trimmed a bit as to even things up.

Now for my biggest platter!  The big one the girls fired for me as a special gift!  Perfect as the template for a big easy curve!

And then to mark oh so carefully!  Instead of the Tailor's chalk (they were out of dark) I had to buy a fabric marking pin that becomes invisible with heat.

Then the cutting is done and I am ready to sew tomorrow!

12/5/14

Christmas Sewing, Making an Oval Christmas Tablecloth, a Special Gift!

My guess is the fabric may be from the early to mid 1900's.
When I went through the vast array of fabrics I have accumulated I found a large vintage piece of cloth that appears to be just designed for a Christmas tablecloth.  Today I measured and laundered it and presently it is adorning my dining room table to give me time to ponder the project.  My table with all of the leaves still in from Thanksgiving is larger than that of the intended recipient but not so much as to alter my process. Pondering is a very necessary component of the things I do in the sewing realm!

If I shorten to drop too much I will loose design.
This is intended to be made for my best friend as a Christmas gift and I don't want to make any unnecessary mistakes of have unforeseen delays. Thus tomorrow I will trek out for some new tailors chalk as mine seems to be hiding from me. Or, maybe I have just used it all?

Diane, my oldest dearest friend,  is an elegant mix of tradition and playfulness and this is reflected in her home.  She has long loved antiques but has broadened into an eclectic mix laced with brightness and fun.

The all over print makes a happy cheery Christmas pattern.
Yesterday she gave me the dimensions of her oval dinning room table, 42" x 82" with the 23" leaf installed.  Today I researched how to make an oval tablecloth and it appears you decide the drop (overhang) around the table and add that to the dimensions.  Next you use a large round object like a big dinner plate as a template and trim off the square corners using that object as a guide. Then you hem.

I am still pondering the drop.
More will follow as I collect my thoughts and get after this project!

10/14/14

Finishing Tied Rustic Vintage Quilt with Antwerp Edging Stitch or Knotted Blanket Stitch

Antwerp Edging Stitch
Monday I cleaned off the dinning room table and spread the rustic hand pieced vintage quilt I have been working on across the top.  It has been a couple of weeks since I have had it out and this would be a good week to try and finish it.  Rain and storms all week and rest my strained left leg a bit.

Trimmed, turned, and pinned.
I trimmed it cutting the batting back about a quarter inch inside the rough edge of the top.  Then I trimmed the muslin underside equal to the pieced top.  Next with straight pins in hand folded both the top and the bottom pieces under equally about 3/8" and at the folded edge pinned all of the way around the quilt.

Slip stitched edges.
My plan is to use quilting thread and hand slip stitch the two folded edges together.  This is my way of basting it together before the decorative finish is applied.  I am crazy about alpaca yarn.  I have no explanation for it.  Just one of the little mysteries of life!  At any rate I want to then do a fancy Antwerp blanket stitch using alpaca yarn matching the ties holding the quilt together all the way around to embellish the finished edge.

Yes, I know this is different, but I like different and so this is the direction I am headed with it!  We shall see how it works out!

My view in the dinning room!
Alpaca yarn is terribly soft and non allergenic.  It makes a soft and not a bit scratchy contrasting
 edge.  I have always loved anything finished with a blanket stitch so I love the idea of trying a variation of it on this piece.

My favorite stitchery book!
Also worth mentioning here is an amazing woman who has more than mastered the hand stitching of the world as far as I can see! Sarah Whittle has published a wonderful book I purchased about a year or so ago and she is a Contemporary Embroidery Artist I am quite in awe of!  Her book details more stitches than I would have guessed exist.  It is called "The Needlecraft Style Directory" and gives beautiful instruction, history, and illustrations of stitches from around the world.  I would highly recommend it for anyone interested in hand work or it's history.

10/6/14

Making Pot Holders to Add to Jenn's Gift This Morning

This first attempt to sew a couple of pot holders took an hour to complete.  I think I'll make me some!
Right after Brian left this morning while still in my PJ's I headed straight to my sewing!  Over the weekend I made these pot holders in my head for two days.  Although I have never actually sewn a pot holder before how hard can this be?  Sooo.....I laid out the left over red ticking right side down, smoothed it with my hands, laid atop two layers of cotton batting, and lastly a final layer of the contrasting red leaf print, right side up.  After smoothing out again I pined where I was certain the four layers ended at each corner and put down my grungy faded potholder as a guide. Using my rotary cutter and my big clear plastic cutting guide I cut two squares of fabric a bit larger than my pot holder. 

I have always loved any color pillow ticking stripes.
And red is such a happy fun color!
Rounded corners?  OK!  I will just use a round metal box I store bobbins in as a guide and mark with a sewing pen, then snip away.  I am ready to sew.  Seems like a good idea to sew a few lines of quilting just to hold everything in place so away we go.  Two lines of stitching across each corner will do it. 

Stitching the loop.
Next to my can of seam tape for a package of extra wide 1" red seam tape.  After pressing it in half with a hot steam iron I cut two 3" lengths for the loop all pot holders seem to have.  I sew the 3" lengths closed and pin them hanging down to the inside with the raw edge even with the raw edge of the soon to be pot holders and stitch them in place.

I could do these all day!
The final step is to stitch the folded seam tape all of the way around the pot holder covering the raw edge by placing the tape so the fold is at the raw edge and the folded edge falls down an equal distance on both sides of the potholder.  Press the loop to the outside now and repeat the row of stitching next to the first.  Done, and they are cut as can be.  Yield 2 reversible pot holders.